Building RESTful APIs with Swagger 2 Documentation using Spring Boot — Creating a Data as a Service (DaaS) Platform (Part 2)
Table of Contents
Building a well-designed and fully-documented RESTful API is crucial for developing modern web applications. In this article, we will explore how to leverage the power of Spring Boot and Swagger 2 to create a robust RESTful API with comprehensive documentation. By following this step-by-step guide, you will learn how to streamline the API development process and enhance its usability through self-descriptive documentation.

Spring Boot: Rapid API Development
Spring Boot is a popular Java framework that allows us to streamline the development of stand-alone, production-grade Spring applications. It eliminates much of the boilerplate configuration required in traditional Spring applications, enabling us to focus on writing business logic rather than dealing with infrastructure setup. With Spring Boot, we can quickly create RESTful APIs with minimal effort, thanks to its auto-configuration and opinionated defaults.
Some key benefits of using Spring Boot for API development include:
- Rapid setup: Spring Boot provides us with a ready-to-run environment with sensible defaults, reducing the time spent on initial configuration.
- Embedded server: Spring Boot includes an embedded server, eliminating the need for external web server setup.
- Dependency management: It simplifies dependency management through its built-in dependency management system, allowing easy inclusion of various libraries and components.
- Auto-configuration: Spring Boot’s intelligent auto-configuration automatically configures components based on the classpath and project dependencies.
- Actuator: Spring Boot Actuator provides powerful management and monitoring endpoints, facilitating health checks, metrics, and other operational tasks.
By leveraging the capabilities of Spring Boot, we can build RESTful APIs efficiently, focusing on business logic and delivering high-quality APIs quickly.
Swagger 2: Comprehensive API Documentation
Swagger 2, now known as the OpenAPI Specification (OAS), is an industry-standard specification for describing RESTful APIs. It enables us to create human-readable and machine-readable documentation for our APIs, making it easier for developers, clients, and stakeholders to understand and consume the API.
With Swagger 2, we can automatically generate interactive API documentation, which includes details about endpoints, request/response models, authentication mechanisms, and more. Some of the key benefits of using Swagger 2 for API documentation include:
- Self-descriptive API: Swagger 2 allows us to define API endpoints, request/response models, and metadata using a concise, standardized format.
- Interactive documentation: Swagger UI, a web-based tool bundled with Swagger 2, generates a user-friendly interface that allows us to explore and test API endpoints directly from the documentation.
- Client code generation: Swagger Codegen can generate client SDKs in various programming languages, saving time and effort for developers who consume the API.
- Design-first approach: With Swagger 2, we can adopt a design-first approach, allowing us to define and refine the API structure, contracts, and specifications before implementing the actual functionality.
By integrating Swagger 2 into our Spring Boot project, we can easily document our RESTful APIs, provide a user-friendly interface for testing and exploration, and foster collaboration between frontend and backend developers.
Setting Up the Project with Spring Boot in Eclipse
Once the project is created, we will see the project structure in the Package Explorer. The structure typically includes directories such as “src/main/java” for your Java source code, “src/main/resources” for configuration files, and “src/test” for tests.
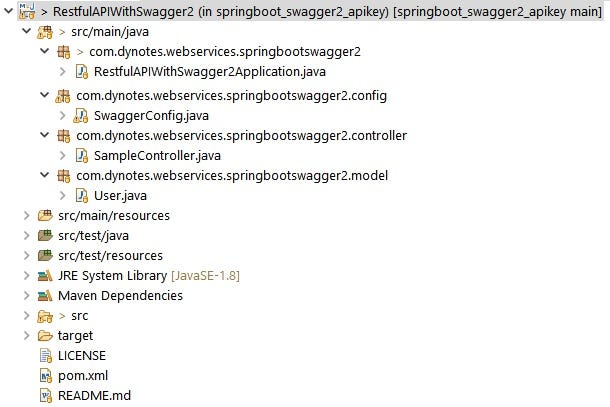
The necessary dependencies are managed through the build tool (Maven is used here) and are defined in the pom.xml (for Maven) file. Eclipse will automatically recognize and manage these files.
<project xmlns="http://maven.apache.org/POM/4.0.0" xmlns:xsi="http://www.w3.org/2001/XMLSchema-instance" xsi:schemaLocation="http://maven.apache.org/POM/4.0.0 https://maven.apache.org/xsd/maven-4.0.0.xsd">
 <modelVersion>4.0.0</modelVersion>
    <parent>
        <groupId>org.springframework.boot</groupId>
        <artifactId>spring-boot-starter-parent</artifactId>
        <version>2.4.5</version>
        <relativePath/> <!-- lookup parent from repository -->
    </parent>

 <groupId>com.dynotes.webservices</groupId>
 <artifactId>RestfulAPIWithSwagger2</artifactId>
 <version>v0.0.1-SNAPSHOT</version>
 <name>RestfulAPIWithSwagger2</name>

    <properties>
        <java.version>8</java.version>
    </properties>

 <dependencies>
  <!-- Spring Boot Web -->
  <dependency>
   <groupId>org.springframework.boot</groupId>
   <artifactId>spring-boot-starter-web</artifactId>
  </dependency>
  <dependency>
    <groupId>io.springfox</groupId>
    <artifactId>springfox-boot-starter</artifactId>
    <version>3.0.0</version>
  </dependency>
  <dependency>
   <groupId>io.springfox</groupId>
   <artifactId>springfox-swagger-ui</artifactId>
   <version>3.0.0</version>
  </dependency>
 </dependencies>

</project>
Configuring Swagger 2 for API Documentation
To expedite development, we leveraged ChatGPT to generate the initial structure of Java files. We then proceeded to make the necessary modifications and customizations to meet our specific requirements.
package com.dynotes.webservices.springbootswagger2.config;

import java.util.Collections;

import org.springframework.context.annotation.Bean;
import org.springframework.context.annotation.Configuration;

import springfox.documentation.builders.PathSelectors;
import springfox.documentation.builders.RequestHandlerSelectors;
import springfox.documentation.service.ApiInfo;
import springfox.documentation.service.Contact;
import springfox.documentation.spi.DocumentationType;
import springfox.documentation.spring.web.plugins.Docket;
import springfox.documentation.swagger2.annotations.EnableSwagger2;

/**
 * Structure from ChatGPT.
 */
@Configuration
@EnableSwagger2
public class SwaggerConfig {

 /**
  * Original from ChatGPT
  * Modified by Yufeng Chen
  */
    @Bean
    public Docket api() {
        return new Docket(DocumentationType.SWAGGER_2)
                .apiInfo(apiInfo())
                .enable(true)
                .select()
                .apis(RequestHandlerSelectors.basePackage("com.dynotes.webservices"))
                .paths(PathSelectors.any())
                .build()
                ;
    }

    private ApiInfo apiInfo() {
     return new ApiInfo(
             "Dynotes API samples",
             "Dynotes API samples using Spring Boot and Swagger",
             "0.1",
             "",
             new Contact("Support", "https://dynotes.com", "support@dynotes.com"),
             "",
             "",
             Collections.emptyList());
    }
}
Defining RESTful Endpoints and Request-Response Models
To define RESTful endpoints in your Spring Boot application, we can use annotations provided by the Spring Web MVC framework. These annotations help map HTTP requests to specific controller methods and define the behavior of your API.
To create request and response models, we define plain Java classes with appropriate fields and annotations. These models will be automatically serialized to and deserialized from JSON by Spring Boot.
source code for a simple controller
package com.dynotes.webservices.springbootswagger2.controller;

import org.springframework.http.ResponseEntity;
import org.springframework.web.bind.annotation.GetMapping;
import org.springframework.web.bind.annotation.RequestMapping;
import org.springframework.web.bind.annotation.RestController;

import com.dynotes.webservices.springbootswagger2.model.User;

/**
 * @author Yufeng Chen
 */
@RestController
@RequestMapping("/api")
public class SampleController {

 /**
  * Original from ChatGPT
  */
    @GetMapping("/hello")
    public String hello() {
        return "Hello, Dynotes API!";
    }

    @GetMapping("/user")
    public ResponseEntity<User> getUser() {
     User user = new User();

     user.setName("John Doe");
     user.setAge(30);
     user.setEmail("johndoe@dynotes.com");

        return ResponseEntity.ok(user);
    }
}
source code of a simple request-response model
package com.dynotes.webservices.springbootswagger2.model;

/**
 * @author Yufeng Chen
 */
public class User {

 private String name;
    private int age;
    private String email;

 public String getName() {
  return name;
 }
 public void setName(String name) {
  this.name = name;
 }
 public int getAge() {
  return age;
 }
 public void setAge(int age) {
  this.age = age;
 }
 public String getEmail() {
  return email;
 }
 public void setEmail(String email) {
  this.email = email;
 }


}
Commonly used annotations for defining RESTful endpoints:
@RestController: This annotation is used at the class level to indicate that the controller class handles RESTful requests and automatically serializes responses to JSON.@RequestMapping: This annotation is used at the method or class level to map HTTP requests to controller methods. It allows you to specify the URL path and HTTP method for handling the request.@GetMapping,@PostMapping,@PutMapping,@DeleteMapping: These annotations are shortcuts for@RequestMappingwith the corresponding HTTP methods. They make it easier to specify the desired HTTP method for your endpoints.@PathVariable: This annotation is used to bind a path variable from the request URL to a method parameter.@RequestParam: This annotation is used to bind a request parameter from the URL query string or form data to a method parameter.@RequestBody: This annotation is used to bind the request body to a method parameter.
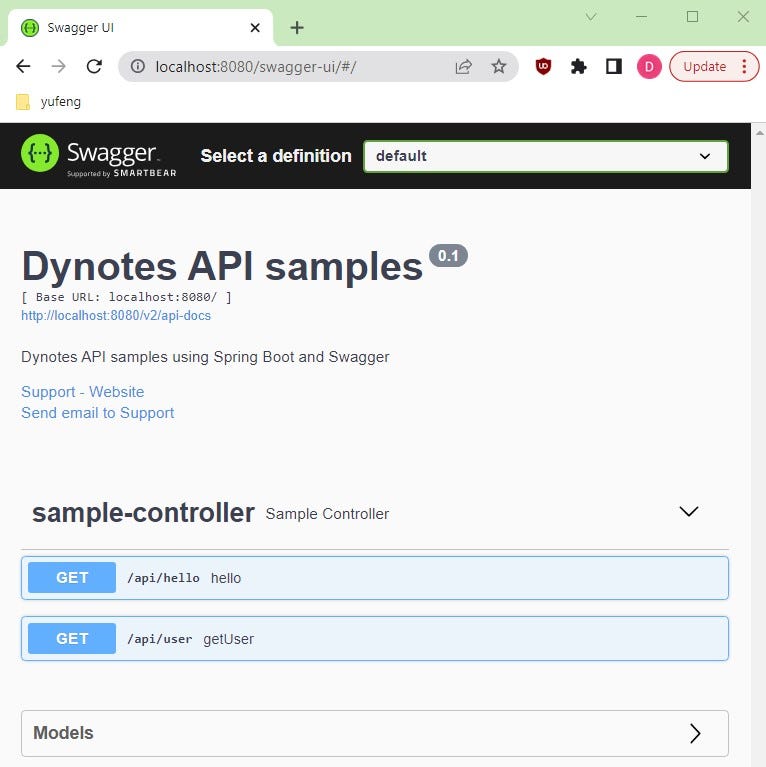
Testing and Documenting APIs with Swagger UI
Swagger UI is a user-friendly interface that is automatically generated from the OpenAPI Specification (formerly known as Swagger). It provides a comprehensive and interactive way to explore, test, and visualize RESTful APIs. With Swagger UI, developers can gain valuable insights into API endpoints, request and response models, available operations, and authentication requirements.
Once you have executed the Spring Boot application, open a new browser tab and navigate to “http://localhost:8080/swagger-ui/“. Upon doing so, you will observe the Swagger UI interface.
Swagger UI offers several features that enhance the developer experience and improve the usability of your API documentation. Some key features include:
- Interactive Documentation: Swagger UI provides an intuitive interface that allows developers to browse and understand the structure of the API. It presents a clear overview of the available endpoints, request/response models, and supported operations.
- API Testing: Swagger UI allows developers to send requests directly from the documentation interface, enabling quick and easy API testing. Developers can input parameters, select HTTP methods, and view the responses within Swagger UI itself.
- Request and Response Examples: Swagger UI automatically generates sample requests and responses based on the defined request/response models. This feature helps developers understand the expected data format and structure.
- Authentication Support: Swagger UI supports various authentication mechanisms, such as API keys, OAuth, and JWT. It provides an interface for inputting authentication details and includes them in the requests made from within Swagger UI. (We will add this in next article)
- Rich Visualization: Swagger UI provides visual representations of the API endpoints, making it easier for developers to navigate and understand the API structure. It offers collapsible sections, expandable models, and the ability to switch between endpoints effortlessly.
If you have a keen interest in the project, you can find detailed information by visiting the following GitHub repository: https://github.com/dynotes/springboot_swagger2_apikey.


Leave a Reply